Introduction
Azure blob storage is the service offered on Azure to store files such as images, videos, VM images, etc. To use it, you need to create an Storage Account. When creating a Storage Account or configuring Blob Storage, there are a few concepts you need to understand to balance storage and retrieval costs. Replication Strategies and Lifecycle Management are two features that are going to help us in that regard. The third feature though, is helping with how securely we could provide access to resources without exposing them to the whole world! Let's take a deeper look into each of those features.
Replication Strategies
Replication strategy or data redundancy helps us to achieve high availability. That means in case of a failure for a physical server that is storing our files, there is another instance somewhere that could serve the request and provide access to the stored file. But, there's no free lunch. Duplicating a file means using more storage and that means more cost and that is exactly why we should know how different strategies work and how they could help us in various scenarios that we need to provide high availability. Azure Storage Account offers five different ways that data could be replicated.
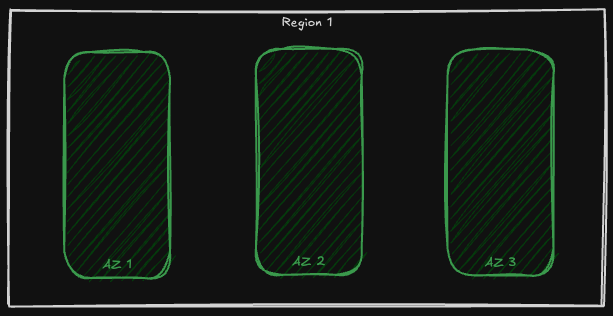
Before, discussing each of those strategies, it is good to know that Azure data centers are spread around the globe and they are grouped into geographical regions called Azure Regions, e.g. North Europe. Within each region there are data centers that are logically grouped into Availability Zone. Each Availability Zone is a logical group of separate data centers with separate infrastructure such as cooling, power, network etc. This way if one Availability Zone (AZ) faces troubles and is not available anymore, other zones could guarantee that regional services are still working.
By knowing that, let's now dig deeper into different data redundancy approaches that we could choose when creating our Azure Storage Account!
Locally Redundant Storage (LRS)
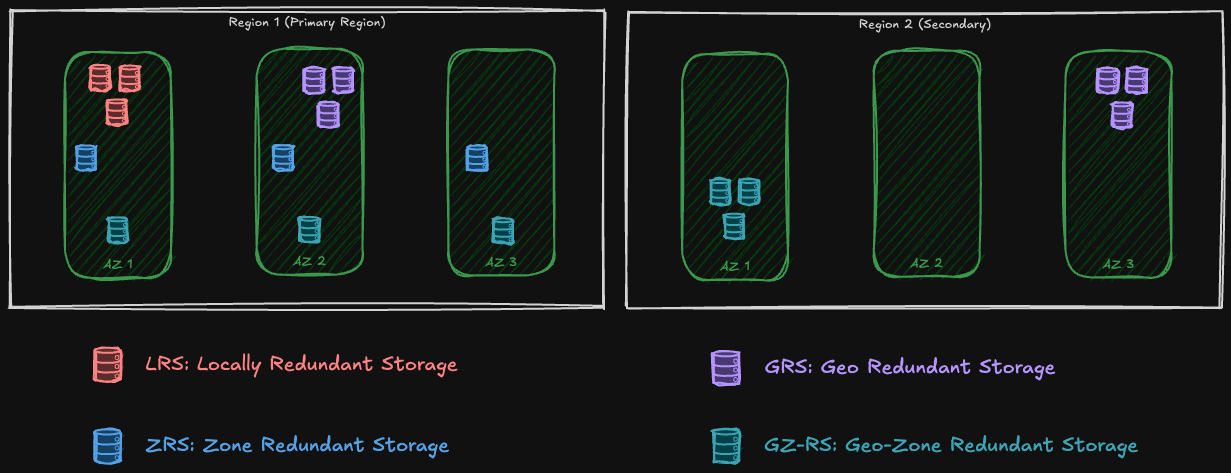
The first one is the simplest. Azure always ensures that three copies of our files are maintained and distributed on different data centers so that if one goes down there's still another copy available. In Locally Redundant Storage (LRS), azure stores these three copies in only one Availability Zone:
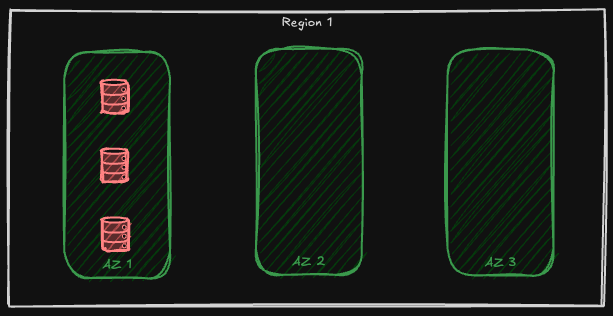
With LRS, we ensure that if a node withing an availability zone is facing an outage, our data is still accessible and we could retrieve them or store new ones. However, if an entire zone or region is facing an outage we do not have access to our data and they might even be loss. LRS, is applicable not only for the blob sub-service, but for other sub-services of Azure Storage Account as well, for instance, queue storage, file storage, table storage, even data lake storage and azure managed disks!
Zone Redundant Storage (ZRS)
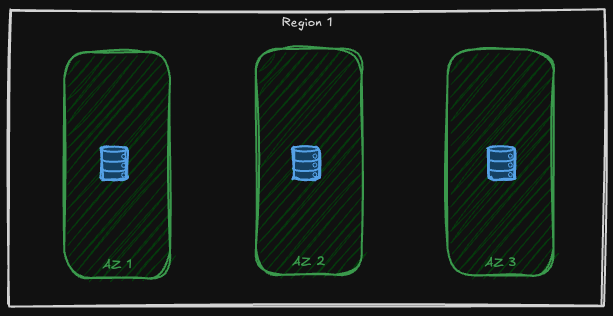
Zone Redundant Storage provides stronger availability guarantees by storing each copy of the data inside a separate availability zone. That means, not only if a node faces outage, but if the whole zone is not up and running anymore, we still have access to our data. Only if the whole region is down we are in trouble!
Same as LRS, ZRS is available on all Azure Storage Services like blob service and Azure files, for the azure files, bear in mind that SSD file shares is supported by LRS and ZRS, see here!
Geo Redundant Storage (GRS)
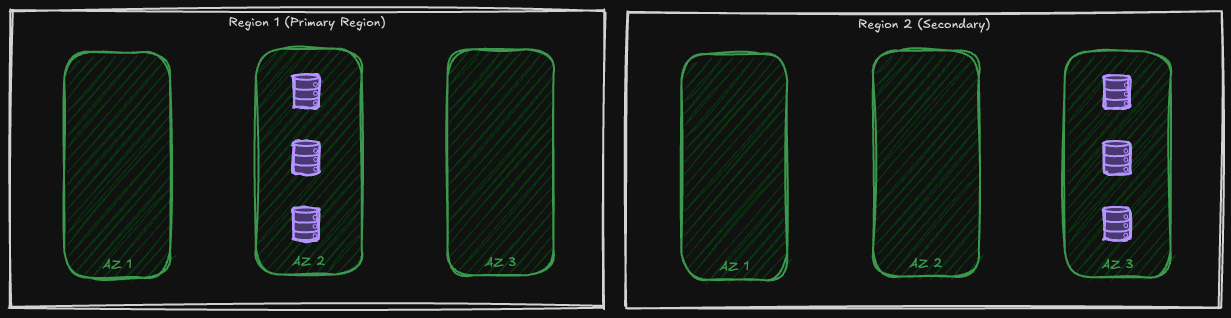
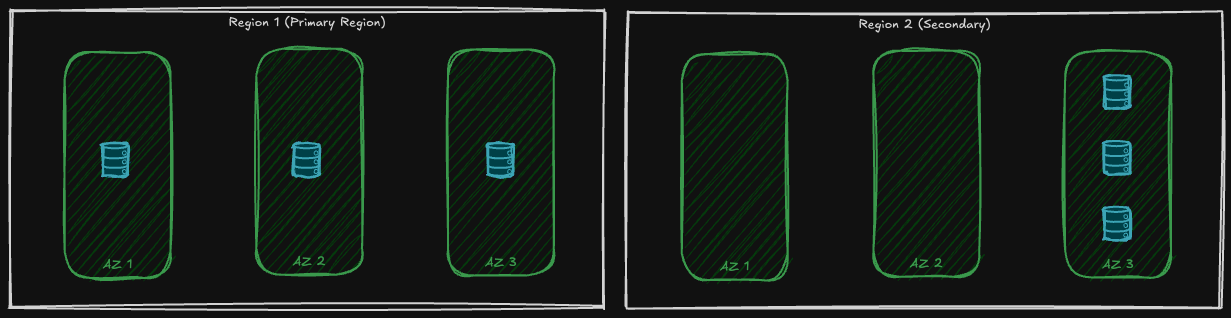
In Geo-Redundant Storage not only the data has three copies in the region that the storage account is deployed to (Primary Region), but there are also another three copies of the data on another region. This ensures that if a region is facing an outage we still have access to our data! Unlike the first two, GRS has no support for Azure Managed Disks and Azure Elastic SAN.
Both primary and secondary regions, host three copies of the data in one Availability Zone:
Geo-Zone Redundant Storage (GZRS)
Geo-Zone Redundant Storage (GZRS) is a mix of ZRS and GRS 😉 That means: in the primary region it is like LRS, three copies are spread into three availability zones, and in the secondary region it is like GRS, three copies are in one availability zone:
To determine if a region supports GZRS, see the Azure region list. To support GZRS, a region must support availability zones and have a paired region.
Lifecycle management
Azure Blob Storage offers four access tiers — Hot, Cool, Cold, and Archive — each with different storage and retrieval pricing.. Hot tier is for frequently accessed files, and the cooler the tier, it costs less in terms of storage, but more regarding retrieval costs. Blobs in the Archive tier can take hours to retrieve. But again, it is a decision between different trade-offs. If a file is not accessed frequently or maybe after some time, never, why paying money to keep it in Hot tier? Azure blob storage Lifecycle management, helps us to set up certain policies to move blobs between access tiers. Optimizing costs for our storage account.
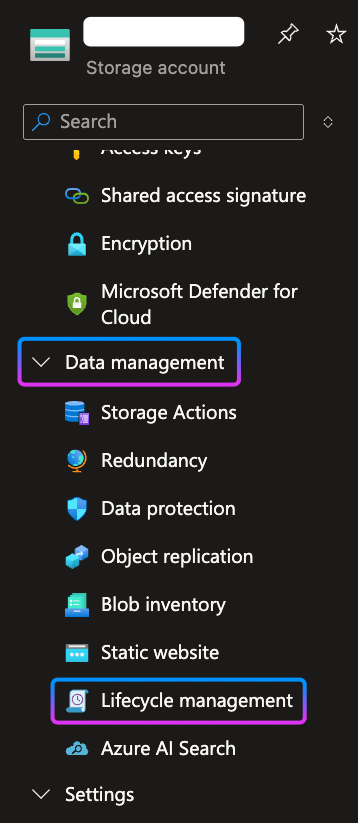
To create a policy within storage account, in the Azure Portal navigate to your storage account and in the left pane go to Data Management section and then Lifecycle Management:
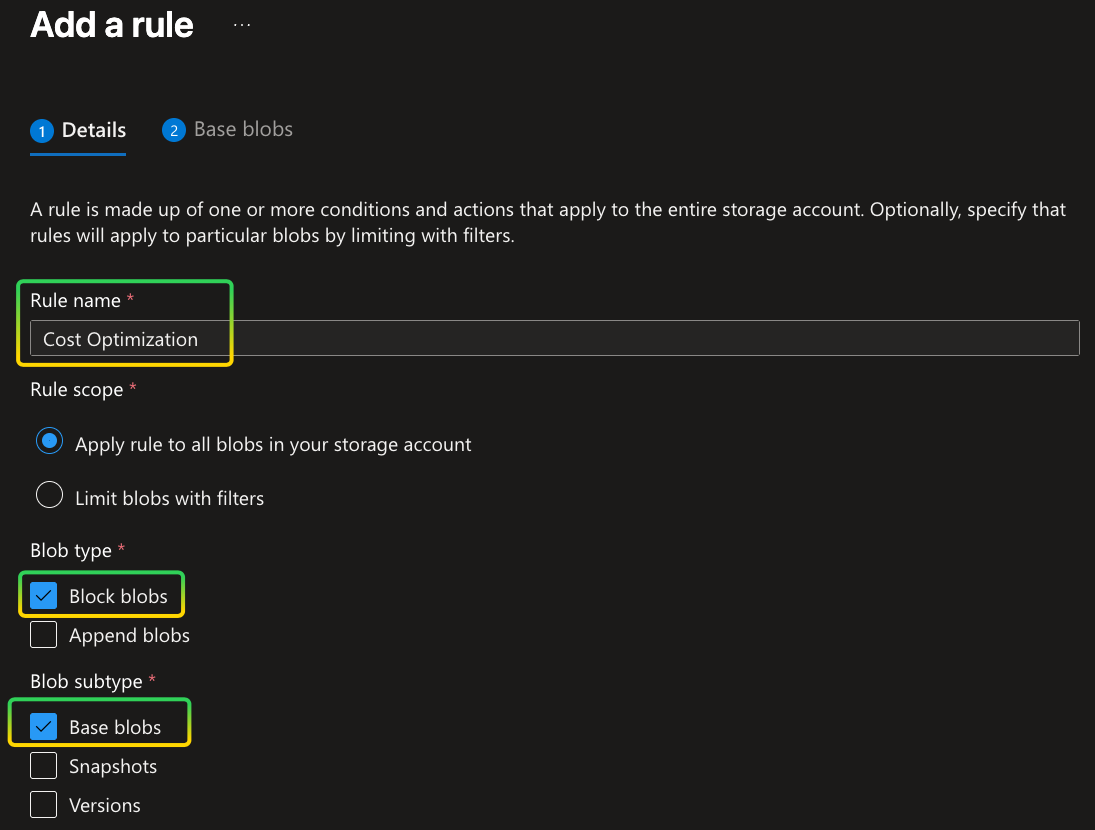
After navigating there, in the main area click on the Add a rule button. By clicking on the button, another page will open in which the first step is to determine the Rule name and which type of blobs this rule is applicable to. In the following example I gave the name Cost Optimization and it is applicable only to Block blobs and only their base blob:
On the next step, you could choose what happens to the selected blobs, when certain days past since they are Created or Last Modified. The decision could be to move to another tier or delete the blob:

You could add more conditions in here! If in the first step you have checked the check boxes for Snapshots and Versions subtypes, you would have more steps to add separate conditions for them too.
Clicking on the Add button at the end will add this rule and runs it on the blobs stored in your storage account!
Shared Access Signature
To access containers and blobs within that container there are a couple of ways, one way is to use connection string with global Access Keys. One could access them by navigating to the storage account and then under Security + networking / Access Keys. An important consideration is that you should always keep these keys in a secure location such as Azure Key Vault, and replace or rotate them once in a while.
With this approach the application using the connection string has full control over the whole storage account! There is no control over the granularity on what they could do and what they could not! There is no expiration date for the Access Keys unless it is manually rotated or new keys generated!
A Shared Access Signature (SAS) Token provides secure, delegated access to resources in Azure Storage account. You have granular control over how a client can access your data, which resource they have access to, what operation could be done and for how long the token is valid!
SAS token is an encoded signed string that will be attached to the resource URI and it has all the required information to authenticate and authorize the request. Following image, from Microsoft documentation, is an example of how it is structured:

SAS tokens are always signed by a key, we will shortly take a look into them, nevertheless, Azure storage supports three types of SAS tokens: 1) Account SAS which is secured using storage account key and gives access at the account level, 2) Service SAS is singed either by storage account key or an access policy created at the service level and grants permissions at the service level e.g. blob and 3) User Delegation SAS which is secured by Microsoft Entra ID and there is no need to any access key or storage account key. It integrates with Managed Identities and uses the permissions of the principal that is requesting the SAS.
Now that we have introduced different types of SAS tokens, let's look at how to generate them
Generate SAS tokens using Access Keys
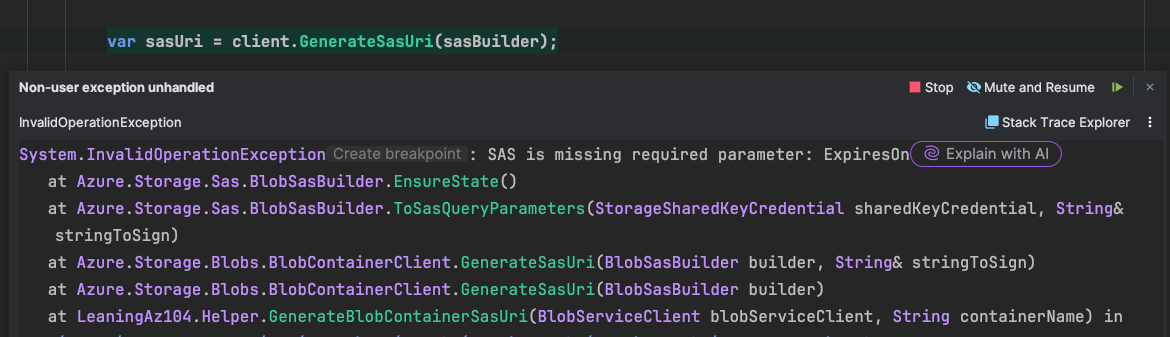
As mentioned earlier, every SAS token needs to be signed, and for that we need a key! One way is to use the Access Keys that are available at the Storage Account. To generate a SAS token using this approach we need instances of BloblContainerClient and BlobSasBuilder classes. The BlobSasBuilder requires some information about the target SAS such as its expiration date, for which service it should be generated, what permissions are required and so on. Not providing the ExpiresOn property results in a runtime exception:
Then we pass the SasBuilder instance to GenerateSasUri method of the BlobContainerClient:
const string containerName = "sample";

const string accountName = "your-storage-account-name";
const string accountKey = "your-storage-account-key";

StorageSharedKeyCredential sharedKeyCredential = new(accountName, accountKey);
var serviceClient = new BlobServiceClient(new Uri(serviceUri), sharedKeyCredential);

BlobContainerClient client = blobServiceClient.GetBlobContainerClient(containerName);

if (client.CanGenerateSasUri)
{
	BlobSasBuilder sasBuilder = new()
	{
		BlobContainerName = client.Name,
		Resource = "c",
		StartsOn = DateTimeOffset.UtcNow.AddMinutes(-5)
	};

	sasBuilder.SetPermissions(
		BlobContainerSasPermissions.Create
		| BlobContainerSasPermissions.Write
		| BlobContainerSasPermissions.List);

	sasBuilder.ExpiresOn = DateTimeOffset.UtcNow.AddHours(1);

	var sasUri = client.GenerateSasUri(sasBuilder);

	Console.WriteLine("SAS URI generated successfully:");

}
Access Keys could be used to generate SAS tokens both at the account level and service level. In the above code we generated that for Container service by passing the c value to the Resource property. Using Access Keys in my honest opinion is the least recommended one from my perspective, because 1) we still need to use the Access Keys of the storage account and 2) There is no way to revoke the SAS tokens that are generated.
Generate SAS tokens using Access Policy
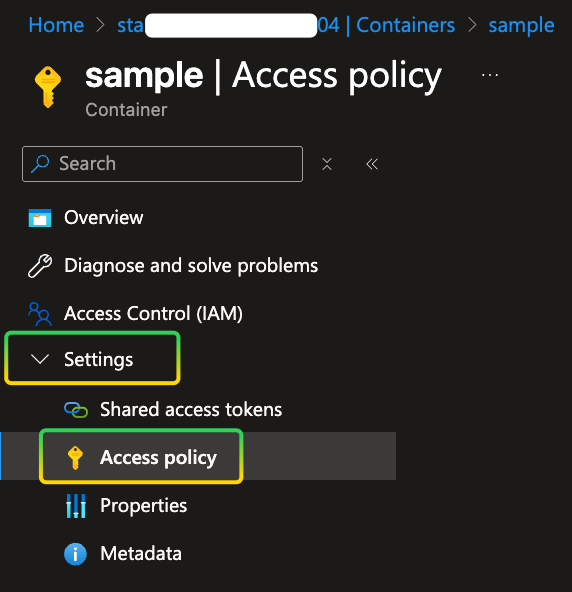
Another more secure approach is to use Access Policy at the service level. It gives us the possibility to revoke tokens after they are generated. To create an Access Policy navigate to the Container service in your storage account and go to Settings/Access policy:
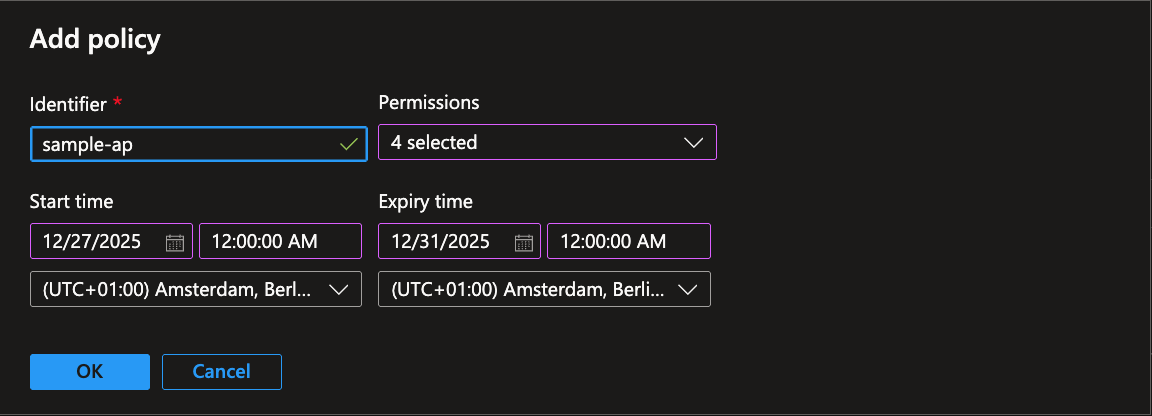
In the main pane, click on the Add policy, a dialog will pop up, enter the required information, such as Identifier, Permissions, Start time and Expiry time, click OK to create the Access Policy:
After clicking on the OK button the Access policy is listed. However, DO NOT FORGET TO HIT THE SAVE BUTTON.
const string accountName = "your-storage-account-name";
const string accountKey = "your-storage-account-key";

StorageSharedKeyCredential sharedKeyCredential = new(accountName, accountKey);
var serviceClient = new BlobServiceClient(new Uri(serviceUri), sharedKeyCredential);

BlobContainerClient client = blobServiceClient.GetBlobContainerClient(containerName);

var storedPolicyName = "sample-ap";

if (client.CanGenerateSasUri)
{
	// When using a stored access policy, permissions and expiry time are defined in the policy itself
	// Do not set permissions, StartsOn, or ExpiresOn in the code
	BlobSasBuilder sasBuilder = new()
	{
		BlobContainerName = client.Name,
		Resource = "c",
		Identifier = storedPolicyName, // Only specify the policy identifier
	};

	var sasUri = client.GenerateSasUri(sasBuilder);

	Console.WriteLine("SAS URI generated successfully:");

}
There are a couple of changes in this code compared to the previous one. First of all, we are setting a property named Identifier to the name of the Access policy that we have created earlier on the Azure portal. Second, there is no code indicating when is the expiration date or what permissions on this resource are required. That is because those values are specified at the Access policy and will be used from there.
If you try to override expiration date, start date, or the permissions in the code from what was set on the access policy, the generated token will NOT work! because a shared access signature can take one of the following two forms:
- Ad hoc SAS: When you create an ad hoc SAS, the start time, expiry time, and permissions are specified in the SAS URI. Any type of SAS can be an ad hoc SAS.
- Service SAS with stored access policy: A stored access policy is defined on a resource container, which can be a blob container, table, queue, or file share. The stored access policy can be used to manage constraints for one or more service shared access signatures. When you associate a service SAS with a stored access policy, the SAS inherits the constraints—the start time, expiry time, and permissions—defined for the stored access policy.
The benefit of this approach over the first one is that now we have centralized control over all the tokens generated by this access policy, and if in any case we need to revoke those tokens, we could simply delete the Access policy from portal and those generated tokens are no longer valid.
Generate SAS tokens using User delegation
User delegation SAS is secured by Microsoft Entra ID and also the permissions requested at the time of generating the SAS. For this to work the Principal that is used to connect to Azure should have Storage Blob Data Contributor role:
{
    "id": "/subscriptions/cc5014ee-f423-4bb9-918e-658310efc239/providers/Microsoft.Authorization/roleDefinitions/ba92f5b4-2d11-453d-a403-e96b0029c9fe",
    "properties": {
        "roleName": "Storage Blob Data Contributor",
        "description": "Allows for read, write and delete access to Azure Storage blob containers and data",
        "assignableScopes": [
            "/"
        ],
        "permissions": [
            {
                "actions": [
                    "Microsoft.Storage/storageAccounts/blobServices/containers/delete",
                    "Microsoft.Storage/storageAccounts/blobServices/containers/read",
                    "Microsoft.Storage/storageAccounts/blobServices/containers/write",
                    "Microsoft.Storage/storageAccounts/blobServices/generateUserDelegationKey/action"
                ],
                "notActions": [],
                "dataActions": [
                    "Microsoft.Storage/storageAccounts/blobServices/containers/blobs/delete",
                    "Microsoft.Storage/storageAccounts/blobServices/containers/blobs/read",
                    "Microsoft.Storage/storageAccounts/blobServices/containers/blobs/write",
                    "Microsoft.Storage/storageAccounts/blobServices/containers/blobs/move/action",
                    "Microsoft.Storage/storageAccounts/blobServices/containers/blobs/add/action"
                ],
                "notDataActions": []
            }
        ]
    }
}
one very interesting permission in the permission list above is Generate a user delegation key, which allows us to generate SAS token using delegation user. First step is to assign this role to the security principal that we are using to generate the token this permission, the principal could be a User, Group or Managed Identity (whether System Managed Identity or User Managed Identity). After that we could use a BlobServiceClient and BlobSasBuilder instance to generate a SAS token:
const string containerName = "sample";
const string serviceUri = $"https://{accountName}.blob.core.windows.net/";

var serviceClient = new BlobServiceClient(new Uri(serviceUri), new DefaultAzureCredential());

// Get a user delegation key (requires Microsoft.Storage/storageAccounts/blobServices/generateUserDelegationKey/action)
var userDelegationKey = await serviceClient.GetUserDelegationKeyAsync(
		startsOn: DateTimeOffset.UtcNow,
		expiresOn: DateTimeOffset.UtcNow.AddHours(1));

BlobSasBuilder sasBuilder = new()
{
		BlobContainerName = containerName,
		Resource = "c",
		StartsOn = DateTimeOffset.UtcNow.AddMinutes(-5),
		ExpiresOn = DateTimeOffset.UtcNow.AddHours(1)
};

sasBuilder.SetPermissions(
		BlobContainerSasPermissions.Create
		| BlobContainerSasPermissions.Write
		| BlobContainerSasPermissions.List);

// Generate the SAS token using the user delegation key
var sasToken = sasBuilder.ToSasQueryParameters(userDelegationKey.Value, accountName).ToString();
var serviceUri = $"https://{accountName}.blob.core.windows.net/{containerName}";
var sasUriBuilder = new UriBuilder(serviceUri)
{
		Query = sasToken
};

var sasUri = sasUriBuilder.Uri.ToString();
Bear in mind that in this approach you should set the ExpiresOn property for th BlobSasBuilder instance and request the permissions that are required. The benefits of this approach is that First we do not need any Access Key from the storage account, the connection uses Managed Identities! The second benefit is that if we need to revoke the generated tokens, we could simply limit the access for the security principal behind the token.
Another thing to notice in the code above, is that it is not using Account Key to connect to the storage account, but Default Azure Credential.
SAS token usage, pitfall, and risks
Beside limiting access to the resources there are a couple of use cases that using SAS tokens makes it more reliable and helps us with the scaling of our application, consider scenarios where you need to do some authorization in your application and when the use has proper access you want to deliver them some blobs, instead of acting as a proxy between the client and the storage account, one could generate a SAS Uri and give the URI to the client.
Another scenario would be when uploading files, after the authorization part in your application is succeeded, instead of uploading the blob to your backend API and then uploading to the storage, you could provide an upload link to the client, of course with the least privileges and an expiration time, and the client directly uploads to the blob storage. This way you don't need to be worry about how to scale your backend if the blob is too big, or there are so many concurrent users uploading. The storage account scalability would handle it for you!
With any approach there are some risks and pitfalls as well, for instance, there is no way that we could track how many tokens with what permissions are generated! Once they are out, they are in the wild and every one having them could use them! (We learned how to mitigate this).
Adhering to best practices helps us to mitigate the issues and leverage the benefits more and more. For example:
- Always generate tokens with least permission possible
- Prioritize SAS generation to 1) User delegation 2) Access Policy 3) Access Key
- Treat them as confidential entity
- Design around the ability to revoke
- Always set an Expiry date
- To manage issues with time zones, set the
StartOnproperty to some time earlier than the actual generation time (depending on your scenario from minutes to one day)
Conclusion
In this (very long 🤦🏻♂️) article, we’ve explored three often overlooked but impactful Azure Storage Account features — replication strategies, lifecycle management, and Shared Access Signatures. Each of these can significantly influence your system’s availability, cost efficiency, and security posture.
When designing storage solutions:
- Choose the right redundancy based on resilience needs and failover expectations.
- Implement lifecycle rules to automatically optimize cost without sacrificing access requirements.
- Favor short-lived, least-privilege SAS tokens and use user-delegation or stored access policies where possible to reduce risks.
With these practices, you not only leverage Azure Storage more efficiently but also build robust, maintainable systems that scale with your team and customer needs.
At the end, thanks for reading, enjoy coding and Dametoon Garm [**]
Related YouTube Videos
Resources
- Storage Account Overview
- What are Availability Zones
- List of Azure Regions
- Introduction to Azure Blob Storage
- Azure Storage Redundancy
- Determine Replication Strategy
- Lifecycle Management Overview
- Access Tiers for blobs data
- Grant limited access to Azure Storage resources using shared access signatures (SAS)
- Create SAS tokens for Storage Container
- Create a User Delegation SAS
- Create a Service SAS for a Container or blob with .NET
- Understanding the Risks of Azure SAS Tokens